Showing posts with label Writing. Show all posts

Monday, August 24, 2020

Pencil Spacer Sticks

Hi, friends!  I wanted to share a quick tutorial on how I made some adorable pencil-themed spacer sticks for my incoming first graders.  In the past, I used plain craft sticks and wrote "spacer stick" on them.  I've also been known to glue a googly eye on them!  Both worked just fine, but I was feeling crafty this year and decided to make some cute ones!

You will need:  

  • tin foil, wax paper, newspaper
  • large craft sticks
  • several small paintbrushes
  • yellow paint
  • pink paint
  • silver/gray paint
  • peach paint
  • black paint


Lay out some paper or foil.  Line up your unpainted craft sticks.  Begin by painting one tip of the sticks with pink paint.  I painted about 3/4 an inch pink.  I did two coats and waited on the pink to dry before repeating the same thing with gray.  Next was yellow.  I did some peach down at the other tip of the stick (also about 3/4 an inch).  Finish off by rounding the tip with a bit of black.  Easy Peasy!

old spacer sticks:


new spacer sticks:


Too cute, right?!?!?
xo
Megan

Tuesday, April 16, 2019

National Poetry Month

Hi, friends!  Did you know that April is National Poetry Month?!  Teaching poetry is one of my favorite Writing Workshop units.  Did you know that there are many benefits of reading poetry aloud to kids?  Below I will share a few with you:

1.  Poetry helps with language development.  Many children's poems rhyme and rhyming helps children build phonemic awareness.

2.  Poetry motivates children to read.

3.  Poetry builds vocabulary.

4.  Poetry helps build fluency.

5.  Poetry allows children to write freely and creatively while de-emphasizing mechanics.

In today's post, I am going to highlight how I've taught this unit in the past.  You can check out the pack in my Teachers Pay Teachers shop at the bottom of this post.  It's a blast and I guarantee you and your students will LOVE it!

The first thing I do prior to starting the unit is request a teacher collection of poetry books from the public library.  I ask for 25-30 children's poetry books.  On the first day of our unit, we peruse the books and discuss what we noticed afterwards.  Sometimes I make a web or word dump on chart paper of what we saw.  I will also use the books as our "opener" to each day's mini-lesson, reading aloud a few poems prior to my instruction.


The next day, I introduce one type of poetry.  This is typically rhythm poetry, as it is very simple for kids to grasp.  I model how to write one, we write one together, and then the kids are off to write their own!  In the past, I would have spent two days on a specific type of poetry, but in more recent years, I spend just one day...time constraints.  Sad! 


Then we move on to acrostic poetry.  I introduce the concept and we brainstorm "SPRING" words (see below) on chart paper.  The kids get a graphic organizer and select one word from each of the letters in spring.  Once their organizer is complete, they use colored strips to write their words on and assemble into a rainbow craft.  These are so great for spring! 


As time goes on, I introduce a new type of poem each day, repeating the same process as I did for rhythm poetry.  By the end of our unit, the kids will have learned 8 different types of poetry. 


We culminate the unit of study by making a poetry anthology book.  This is where the kids select one piece of each type of poetry to place in a construction paper "booklet" with a cover.  We share our poetry anthology's with families at our annual "Poetry Cafe."  The cafe is a celebration where we serve donuts/muffins and juice/coffee to the parents and allow the kids to read two poems of their choice into a microphone.  It's always a hit and kids and parents come back years later telling me they remember and loved it!!!


Happy Poetry month!!!


xo
Megan


Sunday, July 9, 2017

Simple Writing Center Idea

I don't know about you but sometimes when I'm planning for literacy centers, I need something quick and simple that doesn't require a lot of prep.  Sometimes I don't have enough "themed" centers for the week and need just one more center to add in.  When those times happen, I can count on my "Writing Center Vocab Posters" for help!  This is a pack of 40 thematic/seasonal vocab pages that can be printed out and placed in clear sleeves or hole-punched and placed on a ring.  You can even print "mini" versions of the posters and have your kids each have their own set for Writing Workshop! One other option for use is to print the posters in the size of your choice and display them each month {if you have a designated Writing Center spot!}.  Also included are two versions of a mini-book where students write their own sentences choosing words from the posters. When I use this set as a center, I only place the posters that relate to the most current holiday or theme in the bin with pre-stapled mini-books.  Easy-Peasy!

If you're interested in checking this Writing Center out, click the cover page below!  I recommend printing/laminating/putting these in sleeves this summer so you can whip them out in a jiffy when you need them throughout the school year!


Enjoy!
xo
Mrs. Wheeler 

Tuesday, February 14, 2017

New Product!

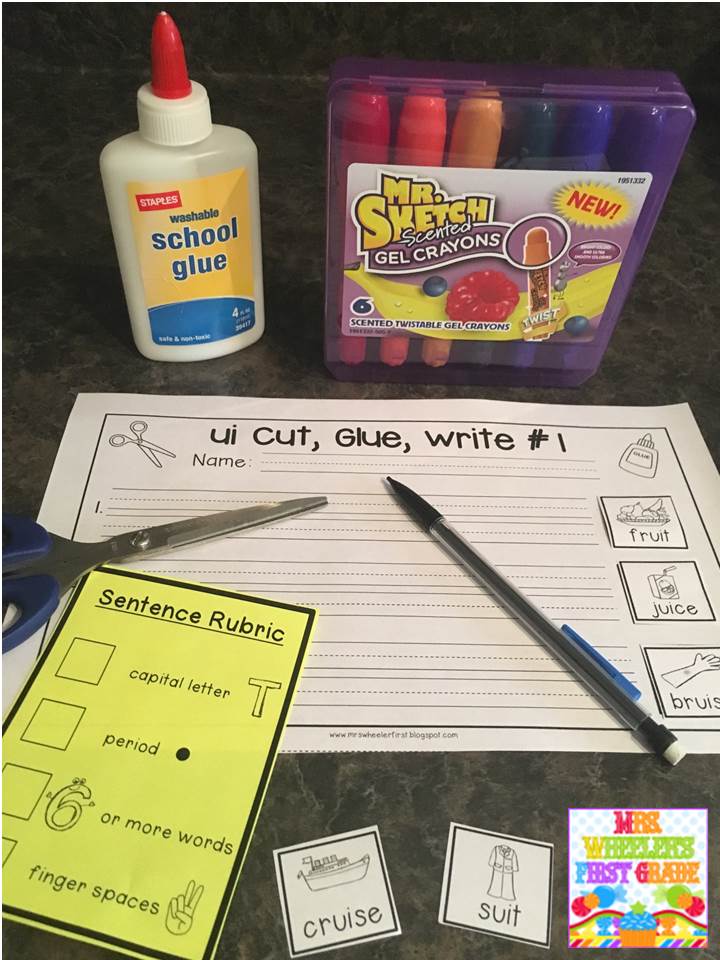
I don't know about you, but it seems like I am always trying to get my first graders to strengthen their sentence-writing skills!  We work on sentence editing a lot, but in addition, I require them to practice writing their own sentences once a week.  I have them practice during our Phonics instruction.  Most days, we play a Phonics game and/or do some sort of word attack activity with the word chunks we're learning, but I always devote one day to sentence writing practice!  My favorite activity to use for this are my "Cut, Glue, and Write" sentence writing packs.  Here's how they work:  Choose a specific word chunk or vowel that you are working on.  Print the page{s} to go with it.  Students will select three words/pictures to cut and glue onto their papers.  They will then use the words to write sentences, with the provided sentence rubric as their guide.  I like these because you're getting two for one: kids are decoding words with chunks we are working on in Phonics AND they are practicing sentence structure.  Win-Win!

So far, I have blends/digraphs, magic e, bossy-r, and vowel teams created.  Each blend/digraph/vowel team has more than one page to go with it, which is nice if you want/need to do this activity more than once with the same blend/digraph/vowel team.

Coming soon is short vowels.  I've created a growing bundle for you if you'd like to save money! Check them out below!  What do you do to help your kids practice sentence writing?


SAVE THAT MONEY!  BUNDLE PRICE WILL INCREASE WITH OTHER TWO PACKS ARE ADDED, WHICH WILL BE SOON!!!


xo
Megan

Tuesday, January 24, 2017

Procedural Writing

Hi, friends!  I've been banned from the computer for the past almost 3 weeks now because I had rotator cuff surgery but was finally cleared to do some computer work yesterday!  Yeah!  I've missed being able to work.  Today's post is all about one of my favorite types of writing: procedural {better known as "how-to}.  I think I love teaching my kids this type of writing because all of the students typically do well and feel successful,  Even the strugglers can feel confident writing a set of simple directions.  I typically teach this type of writing right before I introduce informational reports.  The non-fiction unit is my favorite!

To launch the unit, we look at some real-world examples of directions and talk about the importance of having clear directions as well as being able to follow them.  I bring in examples of board game directions, recipe cards, and books.  Next, we watch a Brain Pop Jr. on "How-To" writing.  I love BPJ and how they break content down for the kids!!  We also discuss temporal words and their role in directions.


Next, we do some sort of attention-grabbing activity that involves writing a how-to report together. In the past, I've done "How to blow bubbles" and "How to make a dirt cup snack."  Both are really fun! We think about the steps for each and write them down together.  I write on chart paper as the kids write on their own papers while completing the steps.


On the days following, my mini-lessons involve me modeling several of my own how-to reports...including using a graphic organizer to jot down things I am good at.  For independent practice, I have kids work in small groups to plan out the steps for a how-to report using a card that I give them.  Once they are ready and can verbalize the steps to me as a group, I let them attempt to write those steps down!


We continue this process of small-group work to meet the CCSS.  Once kids are ready, the transition to writing their own how-to reports with their own ideas!  This is such a fun unit!

Grab the "Dirt Cup" freebie below and be sure to check out the whole unit, as well!


And for a super-fun, holiday-filled pack of how-to writing, check out this!


xo
Megan